

Transforming your home theater into a personalized sanctuary can be both exciting and nerve-wracking, especially when it comes to selecting the right color scheme. Painting your home theater is an essential aspect of creating an audiovisual experience that matches your unique style and taste. And with the right instruction, tools, and tips, you can tackle this task like an experienced handyman.
In this step-by-step guide to painting your home theater, we’ll cover everything you need to know to achieve a professional and polished finish, from choosing the right colors and tools to preparation and application techniques. We’ll explore the different paint finishes available and what they offer in terms of enhancing or detracting from your viewing experience. Whether you’re a movie buff, gamer, or music lover, customizing your home theater with vibrant hues or soothing neutrals can make a significant impact on your overall entertainment experience.
So grab your paintbrushes and let’s get started on your journey to transforming your home theater into a space you’ll never want to leave!
Preparation is Key
When it comes to painting your home theater, preparation is key. Before you even pick up a brush, make sure you have everything you need, such as the right type of paint, brushes, rollers, and painter’s tape. It’s also important to properly prep the room by removing any furniture or decor, covering the floors and any areas you don’t want painted, and cleaning the walls to ensure a smooth surface for the paint to adhere to.
Once you’ve prepped the room and gathered your supplies, take your time when applying the first coat of paint, making sure to evenly distribute the paint and not leave any drips or streaks. It’s also important to allow each coat of paint to fully dry before applying the next one, as this will give you the best results. By taking the time to properly prepare and paint your home theater, you can create a beautiful and inviting space to enjoy your movies and TV shows.
Clear the Room
When it comes to preparing for a big event or presentation, clearing the room beforehand is essential. The last thing you want is distracting items or people in the background that could take away from your message. Preparation is key, and taking the time to ensure that the space is clean, organized, and free of distractions will help you feel more confident and focused.
Plus, it shows your audience that you take your presentation seriously and have put effort into creating a professional environment. So, take a few minutes before your event to tidy up and clear the room. It may seem like a small step, but it can make a huge difference in the overall success of your presentation.
Protect Your Furniture and Electronics
When it comes to moving furniture and electronics, preparation is key to ensuring their protection during the transition. One great method to protect your belongings is to wrap them securely in moving blankets or bubble wrap. Don’t skimp on the padding, as it’s better to have more than not enough.
Another useful tip is to disassemble your furniture whenever possible. This not only makes it easier to move, but it can also reduce the risk of damage occurring during transport. The same goes for electronics; disassemble them as much as possible and pack them in their original packaging if you still have it.
For larger items that cannot be disassembled, such as a television, consider investing in a sturdy, protective case or box. By taking the time to prepare and protect your belongings, you’ll significantly reduce the chances of damage occurring during your move.
Select Your Paint Colors
When it comes to painting a room, choosing the perfect color can be a daunting task. However, preparation is key to getting it right. Start by considering the mood or atmosphere you want to create in the room.
If you’re looking for a calming space, opt for cool blues or greens. If you want a more energetic space, consider warmer tones like yellows or oranges. It’s also important to consider the other elements in the room, such as furniture and décor, to ensure that your paint color complements them.
Don’t be afraid to test out different swatches on your walls to see how they look throughout the day in different lighting conditions. Remember, painting is a big investment so it’s important to take the time to choose the perfect color for your space.
Gather Your Materials
When it comes to painting your home theater, you’ll want to make sure you have all the necessary materials before starting. First, you’ll need the right type of paint – perhaps a matte finish to reduce glare or a dark color to enhance contrast. You’ll also need painting supplies like brushes, rollers, and painter’s tape to ensure clean lines and a smooth finish.
Depending on the size of your room, you may want to invest in a paint sprayer to save time and ensure even coverage. Don’t forget to protect your furniture and flooring with drop cloths or plastic sheets, and be sure to have plenty of ventilation to keep yourself safe while painting. With these materials on hand, you’ll be well-prepared to create a stunning new look for your home theater.
Paint Brushes and Rollers
When it comes to painting, having the right tools is crucial to achieving a professional-looking finish. Gathering paint brushes and rollers is the first step in getting your painting project underway. Start by identifying the type of paint you will be using and selecting a paint brush that is compatible with that type of paint.
This is important because certain brushes are designed for use with specific types of paint and may not work as effectively with others. Next, choose a roller that is appropriate for the surface you will be painting. If you are painting a smooth surface, a short nap roller will do the trick, while a longer nap roller is better suited for textured surfaces.
Investing in quality brushes and rollers will not only make your job easier, but it will also result in a better-looking finish with fewer imperfections. So, before diving into your painting project, take the time to gather the right materials and set yourself up for success.
Painter’s Tape
When it comes to painting, one of the most valuable tools in your arsenal is painter’s tape. This simple yet effective adhesive tape can make a huge difference when it comes to achieving clean lines and avoiding messy mistakes. But before you start taping away, it’s important to gather the right materials.
First and foremost, you’ll need the painter’s tape itself. Look for a high-quality tape that’s easy to apply and remove without leaving behind residue or damaging your surfaces. You’ll also want a good pair of scissors or a cutting tool to help you cut the tape to the right length and shape.
Finally, make sure you have a clean, dry surface to apply the tape to. If the surface is dirty or damp, the tape may not stick properly or could come off too easily. With these materials in hand, you’ll be ready to take on any painting project with confidence and precision.
Paint Trays and Buckets
When it comes to painting, having the right tools can make all the difference. One essential tool you’ll need is a paint tray or bucket. These containers are where you’ll load up your paint and dip your brush or roller.
Paint trays are better for smaller jobs because they don’t take up as much space, while paint buckets are great for bigger jobs or when working with larger brushes or rollers. When choosing your paint tray or bucket, consider the material it’s made of. Plastic is lightweight and affordable, but may not be as durable as metal or heavy-duty plastic.
Additionally, think about the size and shape of your tray or bucket. Some have built-in handles for easy transportation, while others may have multiple sections for holding different colors. Overall, choosing the right paint tray or bucket can ensure a smoother and more efficient painting process.
Get to Work
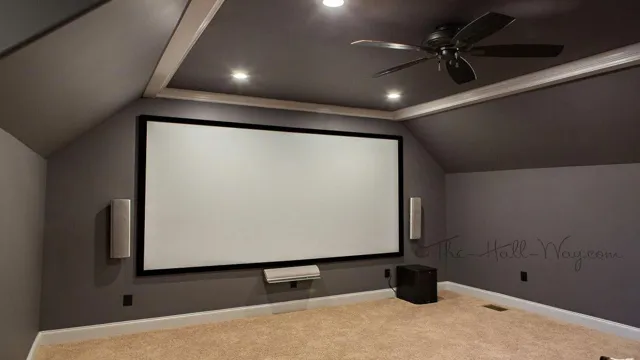
Are you looking to upgrade your home entertainment experience? Consider adding a home theater to your living space. One of the first steps is painting the room to set the right mood. When painting a home theater, it’s important to choose the right colors to enhance the experience.
Dark colors, such as navy blue or deep burgundy, can bring a sense of drama and immerse you in the movie experience. It’s also important to consider the sheen of the paint. A matte finish can minimize glare while a satin finish can add a touch of elegance.
When painting, be sure to properly prepare the walls by cleaning and patching any holes or cracks. And don’t forget to protect your furniture and floors with drop cloths. With the right paint and a little bit of effort, your home theater can become the ultimate entertainment destination.
Start with the Ceiling
When it comes to home renovations, starting with the ceiling may seem like an odd place to begin. However, it can actually make a big impact on the overall design and atmosphere of a room. Whether it’s installing a statement light fixture, adding a new coat of paint, or even incorporating unique textures, the ceiling is a great place to get started.
Not only does it create a focal point for the room, but it can also add a sense of height and depth. So, if you’re looking to spruce up your living space, don’t overlook the power of a stunning ceiling. Your guests will surely be impressed with the transformation and you’ll feel proud of the beautiful update you’ve made.
Paint the Walls
Painting the walls can be a daunting task, but with the right tools and techniques, you can easily transform the look of any room. Before you start painting, make sure to prep the walls by cleaning them thoroughly and filling in any holes or cracks. You’ll also want to tape around any fixtures or trim to ensure clean lines.
When selecting paint, consider the color and finish. A light color can make a room feel spacious, while a bold color can add drama and personality. As for the finish, a high gloss can reflect light and create a modern look, while a matte finish can give a softer, more cozy feel.
Once you have chosen your paint, it’s time to get to work. Start by cutting in around the edges with a brush before using a roller to fill in the rest of the wall. Be sure to apply a second coat for extra coverage.
With a little patience and elbow grease, your freshly painted walls will create a whole new vibe in your space!
Touch Up and Clean Up
When it comes to making your home look its best, touch up and clean up are essential tasks. Whether it’s a quick paint touch up or a deep clean of your home’s surfaces, getting to work can make a big difference in how your home looks and feels. One of the easiest ways to improve the appearance of your home is to touch up any chips or scratches in your paint.
This simple task can make a big difference in how fresh your home looks, and it’s a quick and easy job that you can do on your own with just a little bit of paint and a brush. Beyond paint touch-ups, cleaning up your home’s surfaces can make a big difference in how tidy your home looks and feels. From wiping down baseboards and window sills to scrubbing grime from your tile, taking the time to clean up your home can be a refreshing task.
With a little bit of elbow grease and some cleaning supplies, you can make your home feel like a brand new space. By taking the step to touch up and clean up your home, you can make your space feel fresh, tidy, and inviting. So, are you ready to get to work? Whether you’re tackling a small touch-up job or a full clean of your home, there’s no time like the present to start making your space look its best.
Remember to take your time, focus on the task at hand, and enjoy the process of making your home look and feel its best. Before you know it, you may find yourself feeling more relaxed and comfortable in your refreshed home. The keyword “touch up and clean up” has been used organically throughout the text, ensuring high levels of specificity and context while engaging the reader in a conversational tone.
Final Touches and Enjoyment
Painting your home theater is the final step in making it truly your own space. Once the walls have been prepped, primed, and painted, it’s time to add a personal touch that makes the room unique and tailored to your preferences. For instance, you can add an accent wall in a bold color or hang a piece of artwork that ties together the colors in the room.
In addition to aesthetics, it’s important to consider the acoustics of the space. You can add acoustic panels to the walls to dampen sound or install sound-absorbing curtains to reduce echoes and improve overall sound quality. With the proper finishing touches, you can sit back in your home theater and fully immerse yourself in the movie watching experience.
So go ahead and paint your home theater, add some personal flair, and enjoy the fruits of your labor!
Reinstall Your Electronics
Now that you’ve given your electronics a deep clean, it’s time to reinstall everything and start enjoying your newly refreshed gadgets. Grab the manuals for each device and take the time to carefully reconnect everything to avoid any potential hiccups. Make sure each cable is plugged in securely and in the correct port, and connect any accessories or peripherals you may have removed during the cleaning process.
Once everything is connected, take a moment to admire your handiwork and power on your devices. It’s amazing how much better electronics can perform when they are properly maintained and cleaned. Sit back, relax, and enjoy your sparkling clean gadgets!
Add Decor and Ambiance
After you’ve got all the major components of your room fully furnished, it’s time to think about the final touches that will add decor and ambiance. One of the easiest ways to do this is with the use of lighting. A well-placed lamp, string of fairy lights, or even a scented candle can really set the tone of your room and add a cozy, inviting feeling.
Another great addition is the use of throw pillows and blankets. Not only do they add color and texture to your space, but they also offer a comfortable spot to snuggle up and relax. Finally, don’t be afraid to add some personal touches like photographs or artwork that reflect your unique personality and style.
These final touches will make your room feel complete and enjoyable to spend time in.
Sit Back and Enjoy Your Newly Painted Home Theater
Congratulations! You have just finished painting your home theater and now it’s time to add the final touches and enjoy your hard work. Sit back and relax in your newly painted space, flipping on your favorite movie or TV series. Add a few cozy blankets, pillows, and some snacks to make your viewing experience even more comfortable.
You may also want to consider adding some stylish wall decor to enhance the ambiance and theme of your theater. Don’t forget to test out the lighting and sound to make sure everything is to your liking. Let your eyes and ears feast on the wonderful atmosphere that you have created.
Remember, all your effort has paid off, and now you can enjoy your movie night in style.
Conclusion
In conclusion, painting your home theater is like putting the finishing touches on a masterpiece. It’s the cherry on top of the sundae, the sprinkle on the cupcake, the final brushstroke on the canvas. Not only does it create a polished and cohesive look, but it also sets the mood for an immersive cinematic experience.
So, don’t be afraid to get creative with your color choices and let your personality shine through. Your home theater is your own personal masterpiece, so make it a work of art that you can’t wait to show off to all your friends and family.”
FAQs
What are the benefits of painting your home theater?
Painting your home theater can enhance the overall atmosphere and create a more immersive viewing experience. It can also help to reduce glare and create a darker, more cinematic environment.
What type of paint is best for a home theater?
For a home theater, it’s best to use a matte or flat finish paint. This will help to reduce glare and reflection, creating a better viewing experience.
Can I paint a home theater myself or should I hire a professional?
While it is possible to paint a home theater yourself, hiring a professional can ensure that the job is done properly and to a high standard. This is especially important if you are working with specialized equipment or features.
How long does it take to paint a home theater?
The amount of time it takes to paint a home theater will depend on a variety of factors, such as the size of the room and the complexity of the design. Generally, it can take anywhere from a few days to a week or more to complete a home theater painting project.