
If you’re looking to install a generator in your home, you’re probably wondering how to install a Generac transfer switch. A transfer switch is an essential component of any home backup generator system, as it connects your generator to your home’s electrical system, allowing it to power your home in the event of a power outage. Installing a Generac transfer switch can seem overwhelming at first, but with the right tools and knowledge, it can be a relatively straightforward process.
In this post, we’ll guide you through the process of installing a Generac transfer switch, from selecting the right switch for your needs to connecting it to your home’s electrical system. Whether you’re a DIY enthusiast or a professional electrician, this guide will provide you with all the information you need to install a Generac transfer switch and ensure that your home is ready for any power outage that comes your way. So, let’s get started and ensure that you’re prepared for any power outage that comes your way.
Prepare for Installation
If you’re looking to install a Generac transfer switch, there are some steps you should take to prepare for the installation process. First, you should make sure that you have all the necessary tools on hand. This may include things like a multimeter, wire strippers, and screwdrivers.
Additionally, you should make sure that you have a clear understanding of the wiring that will be required for the installation. You should also consider the location where the transfer switch will be installed, and make sure that it is easily accessible and protected from the elements. Finally, you should be sure to read and follow the manufacturer’s instructions carefully, as improper installation can result in damage to your home’s electrical system, or even pose a safety hazard.
With proper preparation and attention to detail, installing a Generac transfer switch can be a relatively straightforward process that can help you ensure reliable backup power for your home.
Check Electrical Panel Compatibility
When preparing for the installation of electrical equipment, it’s crucial to check the compatibility of your electrical panel. Your electrical panel regulates the electricity in your home, so you need to make sure that it can safely handle your new equipment’s electrical load. If your electrical panel is outdated or unable to handle the new equipment’s requirements, you might need to upgrade it.
An upgrade might seem like an unnecessary expense, but it’s essential for the safety and functionality of your equipment. Think of it as your electrical panel being the heart of your home’s electrical system – you want to make sure it’s healthy and working correctly to avoid problems down the line. So, if you’re installing new electrical equipment, take the time to check your electrical panel’s compatibility and, if necessary, invest in an upgrade.
It will provide you with peace of mind, knowing that your home’s electrical system is in good working order.
Select Suitable Location for Transfer Switch
When it comes to installing a transfer switch, one of the most important steps is selecting a suitable location for the switch. This means finding a spot that is easily accessible and visible in case of an emergency, but also keeping in mind the distance from the power source and other electrical components. The location should also be dry and easily ventilated, in order to prevent the switch from overheating.
In addition, it’s important to consider any local building codes or regulations that may apply, as they may dictate specific requirements for the location of transfer switches. By taking the time to carefully choose the location for your transfer switch, you can ensure that your backup power system will be both effective and safe to use in any situation. So make sure to be vigilant when selecting the location and prioritize safety over anything else.
Gather the Necessary Tools and Components
To prepare for the installation of your project, it’s important to have all the necessary tools and components on hand. This includes basic tools like screwdrivers, pliers, and wire cutters, as well as any specialized tools that may be needed for your specific project. Additionally, make sure you have all the necessary components, such as cables, power supplies, and connectors.
It’s a good idea to double-check the manufacturer’s specifications to ensure that you have everything you need before you begin the installation process. By taking the time to gather all the necessary tools and components, you’ll be able to work more efficiently and effectively, resulting in a better end product. So, take a moment to make sure that you have everything you need before diving in.
Remember, proper preparation is key to a successful installation!
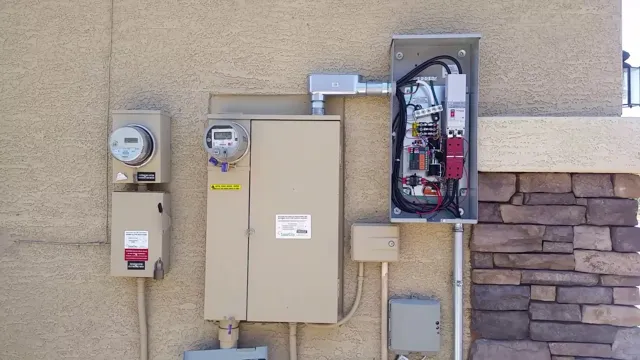
Mount and Wire the Transfer Switch
So, you’ve decided to install a Generac transfer switch to protect your home during power outages. Great choice! But how do you actually install it? First, mount the transfer switch in a dry and easily accessible location near your main electrical panel. Make sure it’s at least 18 inches off the ground and away from any flammable materials.
Next, turn off the power to your home at the main circuit breaker and remove the cover of your electrical panel. Connect the transfer switch wires to the corresponding wires in your panel, ensuring a tight and secure connection. Finally, connect the generator to the transfer switch using a special power cable and turn on the generator to test the system.
With your Generac transfer switch installed and wired properly, you can rest easy knowing your home will stay powered during any unexpected outages.
Turn off the Main Power
Before beginning to mount and wire the transfer switch, it’s crucial to turn off the main power. This might seem like a no-brainer, but it’s a crucial step that can be easily overlooked. Turning off the main power ensures that there is no electricity flowing through the system, minimizing the risk of accidents, and ensuring your safety.
Once the power is off, you can begin to mount and wire the transfer switch. It’s important to follow manufacturer instructions carefully, as the process may vary depending on the make and model of the switch. Mounting the transfer switch involves installing it in a suitable location, such as near the main panel or near the generator.
You will need to wire the switch to the main panel, the generator, and any additional circuits that you wish to power during an outage. Once properly mounted and wired, the transfer switch will allow you to safely switch between power sources depending on your needs, giving you peace of mind even during power outages.
Attach the Transfer Switch to the Wall
To mount and wire the transfer switch, you will need to attach it to the wall in a secure and accessible location. Start by selecting a spot where you will have easy access to the switch, but still out of reach of children or pets. Next, mark the locations where you will need to drill holes to attach the switch using the provided template.
Then, using a power drill, make the holes and attach the switch using the appropriate screws. Once it is securely mounted to the wall, you can begin to wire the switch according to the manufacturer’s instructions. Remember to turn off the power supply before connecting any wires to avoid electrical shocks or injury.
By properly mounting and wiring the transfer switch, you can ensure that your backup generator will function correctly during a power outage, providing peace of mind and security for your home or business.
Connect the Wires According to the Diagram Provided
When it comes to installing a transfer switch, proper wiring is essential to ensure the safe and efficient operation of your backup generator. The first step is to mount the transfer switch as close as possible to the electrical service entrance. Then, refer to the diagram provided with your switch to connect the wires.
Keep in mind that the wiring process may differ depending on the make and model of your transfer switch. Generally, you’ll need to connect the utility power wires, generator power wires, and load center wires to their corresponding terminals on the transfer switch. It’s crucial to follow the color-coding provided in the diagram, as this will help avoid confusion and mishaps during the installation process.
Be sure to check all connections to ensure they’re secure, and then turn the circuit breakers off before turning on your generator to test the transfer switch. A properly wired and installed transfer switch helps ensure that you have power during an outage, which can be a real lifesaver in emergencies.
Test the Transfer Switch
Installing a Generac transfer switch can save you a lot of headache during a power outage, but it’s important to make sure it’s installed correctly and working properly. One key step in the installation process is testing the transfer switch. After the installation is complete, turn off the power to your home and turn on the backup power source.
Then, test each circuit to ensure they are correctly switched to the backup power. It’s also a good idea to test the transfer switch periodically to make sure it’s still working as it should. With a little bit of effort and diligence, your Generac transfer switch can provide you with reliable backup power for years to come.
Turn on the Main Power and Test the Switch
When it comes to installing a transfer switch, testing the switch is an important step to make sure it will work in an emergency. Once the main power is turned off, it’s time to turn it back on and test the switch. Make sure the switch is in the “off” position before turning on the main power.
Then, switch it to the “on” position and check that it is working properly. One way to do this is to run a small test load through the transfer switch, such as turning on a few lights. If there are no issues, the switch is working as intended.
It’s important to note that if there are any problems during testing, the switch should be immediately turned off and the issue resolved before using it during an actual power outage. With proper testing and maintenance, a transfer switch can be a reliable tool for keeping your home powered during emergencies.
Check the Functioning of the Transfer Switch
As an essential component of your backup power system, it is crucial to test the functionality of your transfer switch regularly. The transfer switch acts as a bridge between your primary power source and your backup generator, ensuring a seamless transition in the event of a power outage. To test the transfer switch, start by switching off your utility power and turning on your backup generator.
Observe the transfer switch during the transition to ensure that it is operating correctly and that there are no delays or malfunctions. Additionally, you can perform routine checks on the switch’s connection points, wiring, and any integrations with your backup power system to ensure that they are secure and functioning correctly. Carrying out regular tests on your transfer switch not only guarantees that your backup power system is working optimally, but also gives you peace of mind in case of an emergency.
Remember, investing in the upkeep of your backup power system can give you the security and protection you need when you need it most.
Conclusion
And there you have it, installing a Generac transfer switch is easier than navigating a corn maze blindfolded. With a little bit of preparation, some TLC towards your electrical system, and a few simple steps, you can feel secure knowing that your home is always covered with backup power. So don’t be left in the dark during the next power outage, get that transfer switch installed and let there be light (even when everyone else is in the dark).
Happy installing!”
FAQs
What is a Generac transfer switch?
A Generac transfer switch is a device that allows you to safely and easily switch your home’s power source from the utility grid to a backup generator during a power outage.
Why do I need a Generac transfer switch?
You need a Generac transfer switch to ensure a smooth and safe transition between your home’s utility power and backup generator power during a power outage. This prevents electrical backfeeding and protects your home and devices from damage.
How do I choose the right Generac transfer switch for my home?
To choose the right Generac transfer switch for your home, you need to consider factors such as your home’s electrical load, the size of your backup generator, and whether you want an automatic or manual switch. It’s best to consult a licensed electrician to help you determine the right switch for your needs.
How do I install a Generac transfer switch?
Installing a Generac transfer switch involves several steps, including turning off the power, mounting the switch, connecting it to your home’s electrical panel and backup generator, and testing the system. It’s recommended to hire a licensed electrician for safe and proper installation.