

Have you ever found yourself without electricity during an unexpected power outage? It can be a frustrating experience, especially if it lasts for hours or even days. However, if you have a generator, you can avoid this discomfort and keep your essential electrical appliances up and running. But how do you connect your generator to your home’s electrical system? In this blog, we will discuss how to hook up a generator to your breaker box, allowing you to power your home during an outage.
So, sit tight and read on to learn more about this essential process.
Gather Tools and Materials
If you’re wondering how to hook up your generator to your breaker box, the first step is to gather all the necessary tools and materials. You’ll need a generator, of course, along with an interlock kit or transfer switch, depending on the type of setup you have. You’ll also need a selection of electrical tools, such as wire strippers, pliers, and a voltage meter.
Don’t forget to stock up on electrical wire, connectors, and other supplies you may need for the installation. Before you get started, be sure to familiarize yourself with the electrical requirements of your home to ensure that your generator can safely supply power to your breaker box. With the right tools and a little know-how, you can easily connect your generator to your breaker box and keep your home powered in the event of an outage.
Generator Cord
If you’ve got a generator and want to ensure that you can use it whenever necessary, investing in a generator cord is a great idea. Before you go out and buy one, however, you’ll need to ensure you have the right tools and materials. Firstly, you’ll need to measure the distance from your generator to the area where you want to use it.
This will determine the length of the cord you’ll need to purchase. You’ll also need to make sure you know the wattage of your generator to make sure you get a cord with the appropriate capacity. Other supplies you may need include wire cutters, electrical tape, and wire strippers.
While it may seem like a daunting project, making sure you have all the necessary supplies before beginning will make the process much smoother. In the end, you’ll be left with a generator cord that ensures you can get the power you need, where you need it.
Interlock Kit
Interlock Kit If you’re installing an interlock kit in your home, you’ll need to gather some essential tools and materials beforehand. One essential tool that you may already possess is a basic screwdriver set. You’ll also need a socket wrench set and pliers for electrical work.
Other required materials include interlock kit components such as a breaker interlock, a panelboard mounting plate, and screws. Additionally, you’ll need a cable to connect the generator to the interlock kit, a lock for the interlock component, and wire connectors. Before diving into the installation process, make sure you have all necessary tools and materials to ensure a stress-free installation.
It’s essential to follow guidelines provided on the interlock kit and be punctilious as a transaction error can lead to electrical hazards. With the proper tools and care, the installation process for an interlock kit can be made straightforward.
Screwdriver
If you’re tackling a DIY project that involves screws, then you’ll definitely need a trusty screwdriver in your arsenal. To get started, gather all the tools and materials you’ll need for the job. The first thing on your list should be a screwdriver, of course! You’ll want to choose the right type of screwdriver based on the screw heads you’ll be dealing with, so take a look at your screws and determine whether you’ll need a flat-head or Phillips-head screwdriver.
Other materials you might need include replacement screws, pliers, a hammer, and some lubricant like WD-40 to help loosen any stubborn screws. Don’t forget to equip yourself with safety gear like gloves and eye protection, too. Once you have everything you need, you’ll be ready to tackle your project with confidence and ease!
Wire Strippers
Wire strippers are essential tools that every electrician or DIY enthusiast must have when working with electrical wires. Before you start your project, gather all the tools and materials you need. For wire stripping, you will need a wire stripper, electrical tape, and new wire connectors.
Ensure that you have the proper wire stripper size, depending on the wire gauge you are working with to prevent damage or injury. The wire stripper should have sharp blades that cut through the insulation without damaging the copper wire. Having all the necessary tools and materials at hand will make your project run smoothly and ensure that you do not have to stop in the middle of the project to search for these basic needs.
Additionally, remember to always wear safety gear and use caution and common sense when working with electricity, regardless of your level of expertise.
Install the Interlock Kit
If you’re wondering how to hook your generator to your breaker box, it’s essential to install an Interlock Kit. This device ensures that your generator and the utility power never run simultaneously, which could be potentially dangerous. The Interlock Kit is a simple and affordable solution that allows you to switch power between your main electrical panel and generator in seconds.
The installation process is straightforward, and you can do it yourself with some basic electrical knowledge and a few tools. First, you’ll need to turn off the power to your electrical panel and remove the cover. Then, you’ll need to mount the Interlock Kit onto the breaker panel and connect it to the breakers.
Once that’s done, you can connect the generator cable to the external power inlet box and connect it to the Interlock Kit. It’s crucial to follow the manufacturer’s instructions closely and consult with an electrician if you’re unsure. By installing an Interlock Kit, you’ll have peace of mind knowing that your home is powered up safely and efficiently during any power outage.
Shut off Power
When it comes to installing an interlock kit, one of the most important steps is shutting off the power. This might sound obvious, but it’s crucial to ensure that the electricity is completely shut off to avoid any accidents or injuries. To do this, you’ll need to locate the main circuit breaker in your home and switch it off.
It’s essential to confirm that the power is off before proceeding with the installation. You can use a voltage detector to test whether there is any electricity flowing before starting your work. If you’re unsure about how to shut off the power, it’s best to consult a professional electrician.
By taking precautionary measures to shut off the power before installing your interlock kit, you’ll be able to ensure your safety and make sure everything goes smoothly.
Remove Panel Cover
When installing an interlock kit, the first step is to remove the panel cover. This gives you access to the electrical panel and allows you to safely install the interlock kit. To remove the panel cover, you will need to locate the screws that are holding it in place.
Usually, they are located along the edges of the panel cover. Use a screwdriver to loosen the screws and remove the panel cover. Make sure to keep the screws in a safe place so that they don’t get lost.
Once the panel cover is off, you can move on to installing the interlock kit. Remember, safety is of the utmost importance when working with electricity. Always take necessary precautions and refer to the manufacturer’s instructions to avoid any mishaps.
Attach Interlock Bracket
When it comes to installing an interlock kit, attaching the interlock bracket is a crucial step in ensuring that the kit functions properly. The interlock bracket is typically installed on the electrical panel next to the main breaker, and it serves as a secure attachment point for the interlock device. To attach the bracket, you will need to use the screws or bolts provided with the kit and align it with the holes on the panel.
Make sure that the bracket is tight and secure before proceeding with the installation process. Once the bracket is in place, you can then proceed with installing the interlock device itself, which will help to prevent backfeeding of electricity and ensure safe operation of your generator. By taking the time to properly install the interlock bracket, you can help to ensure the overall effectiveness and safety of your backup power system.
Connect the Generator Cord
If you’re looking to provide backup power to your home during an outage, it’s essential to know how to hook up your generator to your breaker box. One of the critical steps in this process is connecting the generator cord to your home’s electrical system. The first step is to make sure your generator is turned off and unplugged.
Next, find the transfer switch, which is typically located near the breaker box. This switch will allow you to safely transfer power from your generator to your home. Once you’ve located the transfer switch, plug the generator cord into the designated inlet on the switch, typically labeled as “generator.
” Finally, connect the other end of the cord to the outlet on your generator, and you’re ready to power up your home. Remember to follow all safety guidelines and consult with a licensed electrician if you’re unsure about any aspect of the process. With a bit of know-how, you can be prepared for any power outage and keep your home running smoothly with your trusty generator.
Plug Generator Cord
When operating a generator, you need to know how to connect the generator cord properly. Before plugging in the cord, make sure the generator is properly grounded and turned off. Next, identify the outlet on the generator and ensure it matches the plug on the cord.
It’s important to note that generator cords come in different lengths, so make sure you choose the appropriate one that can reach the desired destination. Once you’ve verified that everything matches up, push the plug into the outlet, making sure it’s snug and secure. Don’t forget to test the connection by turning on the generator and checking the power output.
Remember, a loose connection can potentially cause electrical fires or harm the devices you’re trying to power, so it’s better to double-check before you start using the generator. Properly connecting the generator cord is crucial for the safe and efficient use of your generator.
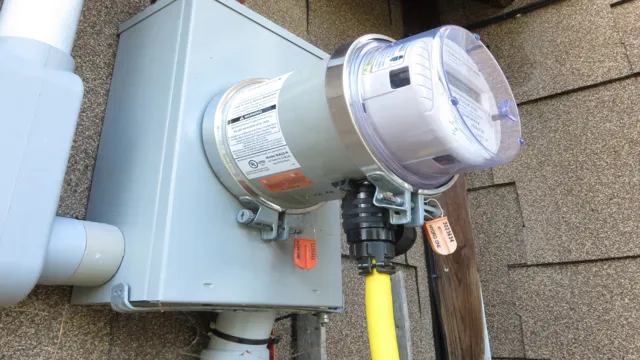
Remove Knockout in Breaker Box
Removing knockout from the breaker box is an essential step in ensuring the safety and effectiveness of your generator. Once you’ve removed the knockout, it’s time to connect the generator cord. It’s imperative that you do this correctly to prevent any accidents or damage.
First, make sure the generator is turned off and unplugged before connecting the cord. Next, locate the inlet box on the outside of your home and connect the generator cord to it. This will allow the electricity to flow directly from your generator to your home’s electrical system.
Finally, start the generator and turn on the necessary circuits, one at a time, to avoid overloading the system. Remember to always prioritize safety when working with electrical equipment. By following these steps, you can ensure your generator is connected safely and efficiently for the next power outage.
Attach Cord to Breaker
When attaching a cord to a breaker for your generator, safety should always be a top priority. Before connecting the generator cord, make sure that both the generator and breaker are turned off. Ensure that the cord and breaker can handle the load as well, meaning the cord and breaker should be rated at least as high as the output of the generator.
Once you have verified these elements, you can connect the cord by plugging the generator end of the cord into the outlet on the generator labeled specifically for this purpose. Then, attach the other end of the cord to the breaker by inserting it into the proper slot. It is important to make sure the cord is securely attached to prevent any electrical hazards or accidents.
Now that you have connected your generator cord, you can turn on the generator and enjoy the power!
Finishing Steps
So, you’ve got your generator and you’re ready to hook it up to your breaker box. First things first, be sure to turn off the main power to your home before attempting any electrical work. Next, you’ll need to install a transfer switch that connects your generator to your home’s electrical system.
This switch will ensure that power flows safely and correctly to your home. Once the transfer switch is installed, you can connect your generator by using a special cord that plugs into the generator and into the transfer switch. Finally, turn on your generator and test your circuits to make sure everything is working as it should.
It’s important to remember that this process involves working with live electrical currents and should only be done by a licensed electrician or someone with ample experience in this type of work. Don’t take any chances with your safety or the safety of your home – it’s always better to be safe than sorry!
Test Generator Connection
After setting up the test generator, the next crucial step is to test the connection. Connect the signal output of the generator to the input of the device under test (DUT). Turn on the generator and the DUT, then start transmitting the signal.
Check the waveform display on the oscilloscope and ensure that the signal is being received by the DUT. You can also use a multimeter to measure the voltage or current of the signal to confirm the connection. It is essential to repeat the same tests with different signal frequencies and amplitudes to verify that the DUT can withstand different levels of stress.
Always double-check all connections to prevent any signal loss. Testing the generator connection can help prevent potential faults in the DUT, ensuring that it operates at optimal levels. With a proper connection, you can confidently carry out further testing of the DUT’s performance and accuracy.
Turn Off Generator and Reconnect Power
After successfully using your generator, it’s essential to turn it off and safely connect your power back to the grid. Begin by flipping the generator switch to the “off” position or shutting it down using the key, depending on the model you have. Allow the generator to rest for a few minutes before disconnecting the cables to ensure there’s no residual electrical charge.
Once it’s cooled down, detach the cables and securely plug them back into the outlet or transfer switch, depending on your power needs. Finally, check to see if your electric mains are switched off before starting the generator. After a brief power outage, re-establishing a stable electrical connection can be a matter of ensuring that all steps are completed in the proper order.
Remember, safety comes first, so be sure to take the necessary precautions and follow each step accordingly.
Important Safety Reminders
As we come to the finishing steps of any project, it’s vital to remember safety precautions to avoid any mishaps. Before wrapping up, make sure to clean up the workspace, tidy up any cords, and properly store any tools or equipment. Avoid leaving any sharp objects or heavy items lying around, as they can pose a risk to anyone nearby.
It’s also crucial to double-check that all electrical appliances are turned off and unplugged, and to securely lock any doors or windows. Remember, safety should always come first, and taking these simple steps can prevent accidents and ensure a successful project completion. So let’s make sure to tidy up and stay safe!
Conclusion
In conclusion, hooking up your generator to your breaker box is like connecting the dots on a cosmic puzzle. It requires patience, precision, and a keen eye for detail. But with the right tools, a little know-how, and a dash of humor, you can electrify your home in no time.
Remember, safety is key, so don’t be afraid to call in a professional if you have any doubts. And as always, keep calm and stay connected!”
FAQs
What do I need to hook up a generator to my breaker box?
To hook up a generator to your breaker box, you will need a transfer switch, an appropriately sized electrical cable, and a generator inlet box.
Can I hook up a generator to my breaker box without a transfer switch?
No, it is not safe to hook up a generator to your breaker box without a transfer switch. A transfer switch ensures that your home is not connected to both the utility power and the generator at the same time, preventing power surges and damage to your home’s electrical system.
What size cable do I need to hook up my generator to my breaker box?
The size of the electrical cable you need will depend on the amperage of your generator and the length of the cable run. It is best to consult an electrician or refer to a cable sizing chart to ensure the cable is properly sized for your specific setup.
Where should I install my generator inlet box for hooking up to my breaker box?
Your generator inlet box should be installed outside near your breaker box, preferably on the same side of the house. This allows for easy cable routing and avoids the need to run the cable through windows or doors. It is important to install the inlet box in a location that is easily accessible in case of an emergency.