

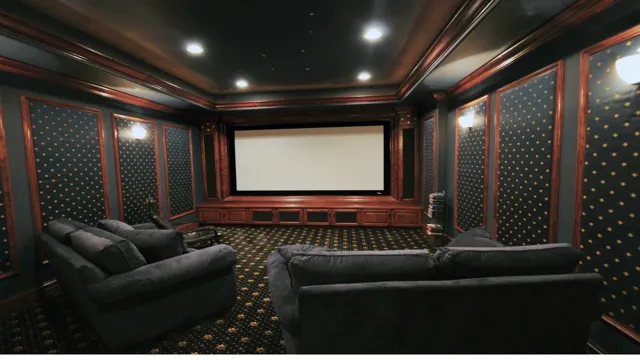
Welcome to the wonderful world of home theater! Whether you’re an avid film buff or simply enjoy the occasional movie night with friends and family, there’s nothing quite like the experience of watching a film on a perfectly set up home theater system. But in order to truly get the most out of your home entertainment setup, it’s essential to consider the acoustic treatment of your viewing space. Acoustic treatment may not be the most glamorous aspect of home theater design, but it plays a critical role in creating the perfect sound environment for your entertainment needs.
In this blog, we’ll explore the perfect layout for home theater acoustic treatment, from room dimensions to sound absorption and diffusion options. Whether you’re setting up a new home theater or looking to improve an existing one, we’ve got you covered with all the tips and tricks you need to achieve the perfect sound environment. So sit back, relax, and let’s dive into the world of home theater acoustic treatment!
Importance of Acoustic Treatment
When it comes to creating a home theater, there’s more to it than just setting up a big screen and sound system. Acoustic treatment is an essential aspect that often gets overlooked. If you want to create a truly immersive experience while watching films or TV shows, you need to pay attention to the acoustics in the room.
The layout of your home theater acoustic treatment can impact the quality of sound you get from your speakers and the overall atmosphere in the room. With proper acoustic treatment, you can reduce unwanted echoes, control the low frequencies, and create a balanced and natural sound. So, before you start designing your dream home theater, make sure you consider the importance of acoustic treatment and the impact it can have on your viewing experience.
By incorporating acoustic panels or sound diffusers in your room, you can take your movie-watching experience to the next level.
Creating Your Basic Layout
When setting up your basic layout for a recording studio, it is important to consider the impact of acoustic treatment. Acoustic treatment involves reducing unwanted noise and reflections within a space, which can greatly improve the quality of your recordings. Without proper treatment, your recordings may sound echoey or muddy, making it difficult to achieve a polished, professional sound.
This can be achieved by using materials such as acoustic panels, bass traps, and diffusers to control the sound within the room. Overall, implementing acoustic treatment in your studio setup is a crucial step towards achieving high-quality recordings and ensuring a successful music production process.
Positioning Absorption and Diffusion Panels
Acoustic treatment is essential in creating a better sound environment for your home studio or performance space. One of the key elements of acoustic treatment is the installation of absorption and diffusion panels. These panels work together to create a more balanced sound experience by either absorbing or diffusing sound waves.
Absorption panels are designed to absorb, or soak up, unwanted sound reflections. These panels come in various thicknesses and densities, and should be strategically placed around the room to target areas with the most excessive sound reflections. This ensures a more balanced sound, without any harsh or boomy frequencies.
On the other hand, diffusion panels scatter sound waves throughout the room, creating a more natural reverberation. Diffusion panels come in different shapes and sizes and should be placed evenly around the room, rather than targeting specific problematic areas. By finding the right balance between absorption and diffusion panels, you can improve the overall sound quality and create a more professional and polished sound environment.
So whether you’re a musician, podcaster, or content creator, investing in quality acoustic treatment is a wise choice that will ultimately enhance the listening experience for you and your audience.
Calculating Reflection Zones
When it comes to designing a home theater acoustic treatment layout, one important factor to consider is the reflection zones. These are areas in the room where sound waves bounce off surfaces and create unwanted echoes, causing sound distortion and reducing the quality of your audio. To calculate the reflection zones, you’ll need to take into account the distance between your primary listening position and the walls, ceiling, and floor of the room.
You can use online calculators or software tools to help you determine the ideal placement of acoustic panels and diffusers to minimize the impact of reflection zones. Taking the time to properly calculate and treat your reflection zones can go a long way in creating an immersive home theater experience with exceptional audio quality.
Locating Early Reflection Points
When setting up an audio system, it’s important to consider the reflection points in your room. Reflection points are areas where sound waves bounce off of surfaces and create echoes, resulting in a distorted audio experience. By calculating the reflection zones, you can determine where to place sound-absorbing material or adjust your equipment to avoid these issues.
To calculate reflection zones, first, measure the distance between your speakers and the walls or ceiling. Then, use a mirror to reflect an imaginary line from the speaker to the wall or ceiling. The point where the line intersects with the surface is the reflection zone.
It’s important to note that these zones will vary based on the shape and dimensions of your room. For example, a rectangular room will have different reflection zones than a room with an angled ceiling or oddly shaped walls. In general, areas where surfaces meet at a 90-degree angle will have the highest amount of reflections.
Once you’ve identified your reflection zones, you can take steps to reduce the amount of reflection in those areas. Adding sound-absorbing panels or diffusers can help, as can repositioning your speakers or adjusting their placement. By taking the time to calculate and address reflection points, you can achieve a cleaner, more accurate audio experience in any room.
Fine-Tuning the Listening Position
When it comes to creating the perfect listening experience, few factors are as important as the listening position. However, finding the optimal listening position requires more than just a comfortable chair and good speakers. To truly fine-tune your setup, you’ll need to calculate your reflection zones.
These are the areas in the room where sound waves reflect off surfaces and create a secondary wave, which can interfere with the sound coming directly from your speakers. By identifying these zones, you can adjust your speaker placement to minimize their impact and create a more accurate, natural sound. To calculate your reflection zones, start by positioning your speakers as you normally would and playing some music or a sound test.
Then, use a mirror to identify where the sound is reflecting from in the room – these are your reflection zones. Keep in mind that different rooms will have different reflection zones depending on their size, shape, and furnishings, so don’t be afraid to experiment with different setups until you find what works best for you.
Using Bass Traps for Low-Frequency Control
If you’re looking to improve the sound quality of your home studio or listening room, bass traps can be a great solution for controlling low-frequency sound waves. But, it’s important to understand the concept of reflection zones and how to calculate them for optimal bass trapping. Reflection zones are areas in a room where sound waves reflect back and forth between opposite walls, creating a buildup of bass frequencies.
These zones can be identified by measuring the distance between opposite walls and dividing it by Then, apply the same calculation to the distance between the floor and ceiling. The resulting numbers will give you the dimensions of the reflection zones, which can be effectively treated with bass traps.
By placing bass traps in these zones, you can reduce the buildup of bass frequencies and achieve a more balanced sound in your room. With a bit of calculation and strategic placement of bass traps, you can take your listening experience to the next level.
Selecting and Installing Panels
When it comes to setting up your own home theater acoustic treatment layout, selecting and installing panels play an important role in achieving the ideal sound quality. Before making a purchase, it is crucial to consider the size of your room, the type of walls and floors you have, and the sound-absorbing properties of the panel material. Generally, there are two types of panels – absorption panels and diffusion panels.
Absorption panels reduce the amount of sound reflections by absorbing sound waves, while diffusion panels scatter the sound waves into different directions, creating a more natural and spacious sound. Depending on the size and shape of your room, you may need to use a combination of both types of panels to achieve the best acoustic result. It is also important to install the panels correctly by placing them strategically on walls, corners, and ceilings.
With proper selection and installation, the panels can greatly improve the overall sound quality of your home theater system, resulting in an immersive and enjoyable viewing experience.
Types of Panels Available
When it comes to selecting and installing solar panels, there are various types of panels available in the market. The most common types of panels are monocrystalline, polycrystalline, and thin-film panels. Monocrystalline panels are made from a single silicon crystal and are highly efficient.
On the other hand, polycrystalline panels are made from multiple silicon crystals and are less efficient than monocrystalline panels but are more affordable. Thin-film panels are lightweight and flexible, making them easy to install on curved roofs, but they are less efficient than monocrystalline and polycrystalline panels. When selecting the type of panel to install, it’s essential to consider your budget, the amount of space available for installation, and your energy needs.
A professional solar panel installer can help you select the best panels for your situation and provide guidance throughout the installation process. By investing in solar panels, you can reduce your carbon footprint and save money on electricity bills in the long term. So what are you waiting for? Go green and switch to solar power today!
Installing and Mounting Acoustic Panels
When it comes to reducing noise and improving the acoustics of a room, acoustic panels are a great solution. But with so many types and sizes available on the market, it can be tough to figure out which ones to choose and how to install them. The first step is to assess the room and determine the areas that need the most sound absorption.
Then, select panels with the right NRC (noise reduction coefficient) rating for that space. Once you have your panels, it’s important to mount them correctly to ensure maximum effectiveness. This involves selecting the right adhesive, measuring and marking where to place the panels, and ensuring they are level and securely attached to the wall.
With a little planning and know-how, installing acoustic panels can be a simple and effective way to improve the sound quality of any space.
Conclusion
In conclusion, a well-planned home theater acoustic treatment layout can make all the difference in the world when it comes to creating an immersive and satisfying viewing experience. Just like a chef carefully selects and balances the flavors in a dish, a home theater enthusiast must balance reflections, absorption, and diffusion to create the perfect sonic environment. So next time you’re enjoying a blockbuster movie in your home theater, remember that it’s not just the speakers and projector that are responsible for the magic – it’s also the carefully crafted acoustic treatment that makes it all possible.
Sound on!”
FAQs
What is home theater acoustic treatment?
Home theater acoustic treatment is the process of improving the sound quality of a home theater by controlling the sound waves in the room with various sound-absorbing materials and diffusers.
Why is acoustic treatment important for a home theater?
Acoustic treatment is essential for a home theater because it enhances the overall sound quality and improves the listening experience by reducing sound distortion, echoes, and reflections.
What are some common materials used for home theater acoustic treatment?
There are several materials used for home theater acoustic treatment, including acoustic panels, soundproof curtains, bass traps, and diffusers.
How do I layout the acoustic treatment for my home theater?
The layout of acoustic treatment for a home theater depends on the dimensions and shape of the room, seating arrangement, and speaker placement. It is recommended to consult a professional acoustic designer to create an optimal acoustic treatment plan.