

Turn your living room into a magical movie theater with just a few simple steps! The perfect movie experience is not just about big screens and clear sound systems – creating a star ceiling can really enhance the atmosphere and transport you to another world. Imagine gazing up at a twinkling night sky – from the comfort of your own home. With some creativity and a little bit of work, a DIY star ceiling is a great addition to any home theater or entertainment room.
So, if you’ve been dreaming about creating your very own star ceiling, this blog post is the perfect guide for you! Discover how you too can turn your home theater into a magical viewing heaven using just a few simple materials and lots of imagination. Get ready to bring the cosmos to your ceiling with your very own movie theater star ceiling!
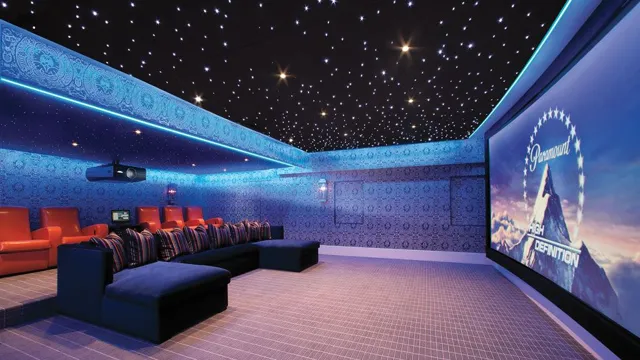
What Is a Star Ceiling?
A star ceiling is a stunning way to add ambiance and a touch of luxury to a room. By incorporating fiber optic cables and LED lights, it creates a starry night sky effect overhead, perfect for creating an immersive atmosphere for watching movies or just relaxing. For home movie theater enthusiasts, a star ceiling is a must-have addition to their setup.
It gives the impression of sitting under a beautiful night sky and adds to the overall feel of the movie experience. With a range of different options available in terms of colors and brightness, a star ceiling can be customized to suit any room’s decor. When searching for home movie theater accessories, consider investing in a star ceiling for an unparalleled viewing experience.
Explanation and Benefits of Installing a Star Ceiling
A star ceiling is a unique and captivating feature that can transform any room into a mesmerizing escape. It is essentially a ceiling that has been decorated with hundreds of small LED lights to resemble the night sky. This effect is achieved by drilling small holes into the ceiling and inserting fiber optic strands that emit light.
Once installed, the result is a breathtaking display of stars and constellations that seem to twinkle just like the real thing. The benefits of having a star ceiling are numerous: it can help soothe and calm the mind, improve the quality of sleep, create a relaxing ambiance, and provide a unique visual element that is sure to impress guests. Additionally, a star ceiling is a wonderful addition to any entertainment room, as it creates a magical atmosphere that is perfect for movie nights or parties.
In short, a star ceiling is a fantastic investment that can add both beauty and function to any space.
DIY vs. Professional Installation
When it comes to creating a home movie theater star ceiling, the question arises: should you attempt to DIY it or get a professional installation? While DIY may seem like the cheaper and more exciting option, it’s important to consider the complexity of the project. For a star ceiling to truly look realistic, it requires attention to detail and a thorough understanding of the materials and equipment. A professional installation ensures that everything is done properly, avoiding mistakes and potential hazards.
Plus, a professional job can save you time and ultimately cost you less in the long run by avoiding costly repairs. Of course, DIY can be a fun and rewarding experience for those with the skills and experience, but for most homeowners, it’s best to leave the job to the professionals. If you do decide to go the DIY route, make sure to do your research and follow all safety protocols to ensure a successful and safe project.
Regardless of which option you choose, the end result will be worth it – a magical star ceiling that will transport you to a galaxy far, far away.
Pros and Cons of Each Option
When it comes to installing a new security system, you have a choice between DIY or professional installation. Both options have their pros and cons depending on your skill level, budget, and time constraints. DIY installation is typically more cost-effective and allows you to have complete control over the process.
However, it requires some technical know-how and can be time-consuming. On the other hand, professional installation ensures that your system is installed correctly and can save you time and stress. However, it comes at a higher cost and may not provide the same level of customization.
Ultimately, the decision comes down to your personal preferences and needs. Are you comfortable with technical tasks and have the time to spare? Then go for DIY installation. Prefer to have a professional handle the installation process and require a higher level of security? Then professional installation may be the better choice for you.
Either way, make sure to do your research and choose a system that fits your specific needs.
Cost Comparison
When it comes to installing home security systems, homeowners might feel torn between doing it themselves or hiring a professional. The cost is often a primary concern, and it’s important to weigh the factors involved. DIY installation might seem like the more affordable option, but it requires a lot of time and effort.
You need to have the necessary tools and skills to install the equipment properly and ensure that it functions correctly. On the other hand, professional installation might involve a higher upfront cost, but it can save you time and ensure proper installation. In addition, professionals often provide warranties, which can give you peace of mind in case any issues arise.
So, while DIY installation might seem like the cheaper option at first glance, it’s crucial to consider the long-term costs and benefits.
Materials and Tools Needed
If you’re looking to create your own home movie theater, a star ceiling is a great way to add a magical touch to your viewing experience. First, you’ll need to gather the proper materials and tools. For the ceiling, you’ll need fiber optics or LED lighting strips, a ceiling tile or drywall, a drill, and a hot glue gun.
For the projector and sound system, you’ll need a projector, speakers, an audio receiver, and wiring. Depending on the size of your theater and personal preferences, you may also want to invest in seating, a screen, and decor to complete the ambiance. With these materials and tools in hand, you’re on your way to creating the perfect home movie theater experience that you and your loved ones can enjoy for years to come.
List of Required Items
When embarking on any project, it’s important to make sure you have all the necessary items before starting. For a DIY project such as building a table, you’ll need materials and tools to ensure the process runs smoothly and efficiently. Required items include wood (in the desired size and type), screws, sandpaper, stain or paint (if desired), a saw, a drill, measuring tape, and clamps.
It’s important to choose high-quality materials to ensure the durability and longevity of the finished product. In addition, having the right tools is crucial to ensure precision and accuracy during construction. Before starting, make sure you have all the required items on hand to avoid any unnecessary delays.
With the right materials and tools at your disposal, you’ll be well on your way to creating a beautiful and functional table that will last for years to come.
Tips for Choosing Quality Materials
When it comes to choosing quality materials for your project, there are a few key tools and resources that will help ensure success. First and foremost, you’ll need to do your research and determine the best materials for your specific needs. Whether you’re working on a construction project or a DIY craft, understanding the durability, longevity, and functionality of each material is essential for making an informed decision.
Additionally, using high-quality tools and equipment will help you work more efficiently and effectively, ultimately resulting in a better final product. Don’t skimp on the basics like measuring tools, saws, and sandpaper – investing in quality tools can save you time and money down the line. By taking the time to gather the right materials and tools, you can ensure that your project is a success from start to finish.
Step-by-Step Guide to Installation
If you’re looking to add a starry touch to your home movie theater, a star ceiling is an excellent option. To create a home movie theater star ceiling, start by measuring the ceiling’s dimensions and deciding on the number of stars you’d like to include. Next, choose the type of fiber optic cable you prefer, either end-lit or side-lit.
End-lit fiber optic cables emit light from the end, while side-lit cables emit light from the side. After selecting the cable type, decide on the star pattern you’d like to create, then drill holes into the ceiling in the same pattern. Thread the fiber optic cable through each hole and attach the cable to a light source, like an LED bulb or a projector.
Finally, turn on the light source and watch as the stars twinkle overhead. With a bit of patience and careful planning, you can bring the beauty of the night sky into your movie theater, creating a cozy and magical space for you and your loved ones to enjoy.
Preparation and Planning
Preparing and planning are crucial steps in the installation process of any system, and it’s no different when it comes to installing software on your computer. Before diving into the installation process, it’s essential to read the system requirements carefully and ensure that your computer meets them. This includes checking the operating system, processor speed, memory, and storage space.
It’s also important to check if any other software needs to be installed first or if there are any incompatibilities between the software you want to install and other programs on your computer. Taking these steps will help prevent potential issues and ensure a smooth installation process. Once everything is in order, it’s time to start installing and following the step-by-step guide provided by the software.
By taking the time to prepare and plan, you’ll save time and frustration down the line, and can enjoy your new software with ease.
Installation Process
So, you have decided to install a new software on your system, and now you’re wondering where to begin! Don’t worry, we’ve got you covered. In this guide, we’ll take you through the step-by-step process of software installation, and help you get it up and running in no time. First and foremost, you need to download the software from a trusted website, and save it in a location where you can easily find it.
Once downloaded, find the installation file and double-click on it to begin the installation process. Follow the on-screen prompts, and choose the appropriate settings, such as the language and destination folder. You may also need to agree to the software’s terms and conditions.
Depending on the software, you may be prompted to select the features you want to install. Once selected, click on the “install” button and wait for the process to complete. The installation time may vary based on the size of the software and your system’s specifications, so be patient.
Once completed, you’ll be asked to activate the software, and you’re now ready to use it! Installation done!
Finishing Touches and Maintenance Tips
After successfully installing your new flooring, it’s important to take care of the finishing touches. One important step is to ensure that all transitions into other rooms or areas are properly sealed and trimmed. This not only gives your flooring a polished look but also helps prevent any damage or wear to the edges of your flooring.
Another important aspect of finishing touches is the application of a sealant or protective coating. This will help your flooring remain durable and resistant to scratches, spills, and general wear and tear. In terms of maintenance, it’s important to sweep or vacuum regularly to prevent debris from accumulating.
Mopping with a damp cloth or using a floor cleaner specifically designed for your flooring material is also recommended. Remember to avoid using abrasive cleaners or harsh chemicals as they could damage the surface of your flooring. By taking these steps, you can maintain the beauty and longevity of your new flooring for years to come.
Conclusion
So, there you have it, folks! The home movie theater star ceiling is the ultimate way to transform your home into the ultimate entertainment sanctuary. With this clever installation, you can bring the magical atmosphere of the cinema to your very own abode, all while basking in the twinkling glow of an endless universe. It’s like having your own personal cosmos right in your living room! So why not add a touch of celestial excitement to your movie nights and take your home theater to the next level with a dazzling star ceiling? Trust us, it’s a surefire way to become the star of your own show!”
FAQs
What is a star ceiling in a home movie theater?
A star ceiling is a decorative feature in a home movie theater that uses fiber optic lights to create the illusion of stars in the night sky.
How do you install a star ceiling in a home movie theater?
Installing a star ceiling can be a complex process, and typically requires the services of a professional contractor or specialty lighting company. The process involves running fiber optic cables throughout the ceiling and using a specialized projector to create the starry effect.
What are some benefits of having a star ceiling in a home movie theater?
A star ceiling can enhance the overall movie-viewing experience by creating a more immersive and realistic atmosphere. It is also a unique and visually impressive feature that can add to the aesthetic appeal and value of your home.
Are there any maintenance requirements for a star ceiling in a home movie theater?
While a star ceiling requires little maintenance, the fiber optic cables may need to be replaced if they become damaged or worn over time. It is also important to keep the projector and other equipment clean and properly maintained to ensure optimal functioning.