
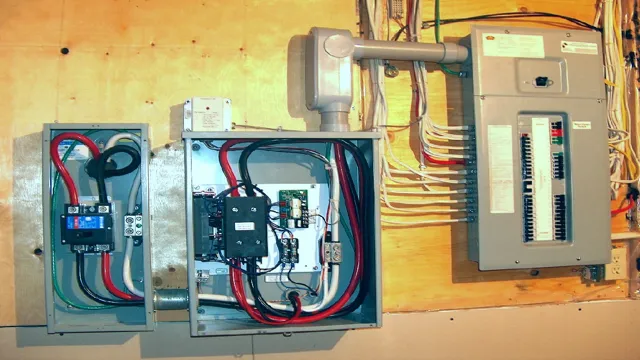
If you’re looking to install a Generac Transfer Switch, you’re in the right place! But before we get into the details, let’s review what a transfer switch is. Essentially, a transfer switch is an electrical device that allows you to switch between your main power source and a backup generator. This is particularly useful during power outages or emergencies when you need power ASAP.
Now, the installation process for a Generac Transfer Switch can seem daunting at first. But don’t worry, with the right guidance and tools, you can easily install it yourself! In this guide, we’ll break down the steps you need to follow to successfully install your Generac Transfer Switch. From ensuring you have the necessary tools and materials to properly wiring your switch, we’ll cover it all.
We’ll even discuss safety precautions you should take during the installation process. So, if you’re ready to take on this project and have uninterrupted power supply, let’s dive in!
What Is a Generac Transfer Switch?
Installing a Generac transfer switch can be a lifesaver during a power outage. This switch works by connecting your standby generator to your home’s electrical panel, thus allowing you to easily and seamlessly switch from utility power to generator power. The Generac transfer switch is designed to operate automatically, so you don’t have to do anything more than sit back and let it work.
These switches come in a range of sizes and styles, depending on your needs and the size of your generator. When it comes to generac transfer switch install, it’s essential to have a licensed electrician handle the installation process. This will ensure that everything is wired safely and correctly, giving you peace of mind in the event of an unforeseen power outage.
Overall, a Generac transfer switch is an important piece of home backup power equipment that will help keep your lights on and your devices charged during a crisis.
Description of Functionality and Importance
A Generac transfer switch is an electrical device that allows the safe and convenient transfer of power between an electrical grid and a backup generator during a power outage. With a Generac transfer switch installed, you don’t have to manually switch between the power sources, as the switch automatically detects when the electrical grid is down and switches over to generator power. This functionality is particularly important for households and businesses that rely on electricity for essential equipment and appliances, as it ensures uninterrupted power supply during a power outage.
With a Generac transfer switch, you can enjoy the peace of mind that comes with knowing that your critical systems will stay up and running even when the grid is down.
Preparing for Install
If you’re planning to install a Generac transfer switch, it’s essential to prepare beforehand to ensure a smooth and successful installation. The first step is to determine the size and type of transfer switch you require based on your power needs. Adequate planning will also help you to choose a suitable location for the transfer switch and to gather the necessary materials and tools.
Additionally, it’s essential to turn off power to your electrical panel and make sure that the generator and transfer switch are compatible. You may also need to hire a licensed electrician to ensure the installation follows all safety regulations and to connect the transfer switch to your home’s electrical system. Overall, the key to a successful Generac transfer switch installation is to carefully plan, gather all the necessary resources, and follow all safety guidelines and instructions.
Checklist of Materials Needed and Tools Required
Preparing for the installation of any new project can feel overwhelming if not adequately prepared. One of the first and most essential steps is creating a checklist of all the required materials and tools needed for the installation. The checklist should include specifics such as the type and amount of material necessary, the size and quantity of hardware required, and any specialized tools that will need to be used.
It’s essential to ensure all necessary materials are purchased and readily available before beginning the installation process. Having everything on hand prevents delays and reduces the need for last-minute runs to the hardware store. As well, having all tools on hand ensures that the installation process can be completed all at once without interruptions.
The key to a successful installation is thorough preparation and following each step of the process carefully.
Steps to Install
If you’re considering adding a generator to your home or business, you’ll likely also need a transfer switch to ensure safe and efficient power transfer. Installing a Generac transfer switch can be a complex process, but with the right steps and tools, it’s definitely doable for the DIYer. First, you’ll need to determine the appropriate location for the transfer switch and mount it securely.
Then, you’ll need to connect the transfer switch to the main electrical panel and generator, making sure to follow all manufacturer instructions and safety guidelines. You’ll also need to test the system to ensure everything is working properly before relying on it during a power outage. While installing a Generac transfer switch can be a challenging task, the peace of mind and convenience it offers in times of need make it worth the effort.
Step-by-Step Guide to Installing the Transfer Switch
Installing a transfer switch can seem like a daunting task, but with the right tools and knowledge, it can be done efficiently and safely. Here’s a step-by-step guide to installing a transfer switch: Turn off the power supply and disconnect the utility lines.
Mount the transfer switch on a sturdy surface near the electrical panel.
Connect a flexible conduit between the switch and the electrical panel. Run the appropriate wires between the switch and the generator.
Connect the transfer switch circuits to the breakers in the electrical panel.
Install an electrical inlet box and connect it to the generator. Connect the generator to the inlet box using a power cord.
Test the transfer switch to ensure it’s functioning properly. Remember to follow all safety guidelines and refer to the manufacturer’s instructions when installing the switch.
Tips to Ensure the Install Goes Smoothly
When it comes to installing anything, even the slightest mistake can cause a lot of hassle. To ensure a smooth install, the first step is to carefully read the instructions provided. Understand what is required to be done and prepare accordingly.
It is important to ensure you have all the necessary tools and equipment before starting the installation process. Additionally, do not skip any steps even if they seem unnecessary or trivial. Even the slightest deviation from the recommended steps could lead to major damage and additional costs.
Another crucial step is to follow safety protocols. Wear protective gear and follow safety guidelines to prevent any accidents. By following these simple yet important steps, anyone can ensure that their installation process proceeds smoothly.
Testing and Maintenance
When it comes to installing a Generac transfer switch, the testing and maintenance process is just as important as the initial installation. Regular testing and maintenance help ensure that your transfer switch will work when you need it most. It’s essential to test your transfer switch at least once a year to make sure it’s functioning correctly.
During these tests, you should ensure that the switch can transfer power from the utility grid to your backup generator efficiently. You should also check the switch’s electrical connections for signs of wear, corrosion, or heat damage and replace them if necessary. Additionally, it’s crucial to keep your transfer switch clean and free of debris, which can damage the switch’s sensitive components.
Maintaining your transfer switch is essential to prevent problems and ensure that it works during power outages, providing you with peace of mind.
Ensuring the Switch Is Installed Properly with a Test
To ensure that switches are installed properly, it’s necessary to conduct testing and maintenance. One way to test the switch is to use a multimeter to check the connections and ensure that they are functioning properly. Before conducting the test, make sure to disconnect the power source and follow all safety precautions.
Additionally, it’s important to clean and inspect the switch regularly to prevent issues from arising. Dust and debris can build up over time, leading to poor performance or even failure. By performing routine maintenance, you can catch potential problems early on and prevent more extensive damage.
Overall, taking the time to test and maintain your switches will prolong their lifespan and improve overall system performance.
How to Perform Regular Maintenance for Longevity
Regular maintenance is crucial in ensuring the longevity of any equipment or machinery. Testing and maintenance should be performed regularly to identify any potential issues before they cause bigger problems. This can include inspecting the equipment for wear and tear, checking fluid levels, and verifying all safety features are functional.
Routine maintenance can also involve cleaning the equipment to remove any debris or build-up that can interfere with proper operation. Incorporating regular maintenance into your equipment’s operational plan can extend the life of your machinery, reduce repair costs, and improve overall safety. By investing in your equipment through preventative maintenance, you can ensure it continues to operate efficiently and effectively for years to come.
Professional vs DIY Install
When it comes to installing a generac transfer switch, there’s a common debate between hiring a professional or opting for a DIY install. While a professional install may give you peace of mind that everything is done correctly and up to code, a DIY install can save you money and give you the satisfaction of completing the project on your own. However, it’s important to keep in mind that installing a transfer switch involves working with electricity, which can be dangerous if not done properly.
If you’re not experienced with electrical work, it’s best to hire a licensed electrician to ensure a safe and efficient installation of your generac transfer switch. Additionally, a professional can offer guidance on the best location for the switch and ensure that it’s properly connected to your home’s electrical system. Ultimately, the decision to hire a professional or complete a DIY install should be based on your level of experience and comfort with electrical work, as well as your budget and time constraints.
But, it’s important to recognize that safety should always be the top priority when dealing with electrical installations.
Pros and Cons of Each Option
When it comes to installing a security system for your home or business, you have two options: professional installation or a DIY approach. Both options have their pros and cons, so it’s essential to weigh them carefully before making a decision. Professional installation is usually the more expensive option, but it comes with several benefits.
Firstly, you’ll have access to professional expertise and experience, meaning your security system will be installed correctly the first time. This will save you time, stress, and any potential risks of installing the system incorrectly. Additionally, some security companies may offer ongoing maintenance and support as part of the package.
On the other hand, DIY installation is often less expensive but can be more time-consuming and labor-intensive. You’ll need to research and purchase the right equipment and tools, spend time installing the system, and troubleshoot any issues that may arise. However, you’ll have more control over the installation process and can ensure that it meets your exact needs and preferences.
Ultimately, the decision to opt for professional or DIY installation comes down to your budget, level of comfort with technology and installation processes, and the level of complexity required for your security needs. It’s essential to weigh the pros and cons of each option carefully before making a decision that fits best for you.
Conclusion and Final Thoughts
In summary, installing a Generac transfer switch is like having an insurance policy for your home’s electricity. With this switch, you can ensure that your home stays powered during a blackout and that your appliances won’t suffer from damage caused by surges or inconsistent power. Plus, with its user-friendly design and easy installation process, you won’t need to be an electrician to benefit from a Generac transfer switch.
So, go ahead and upgrade your home’s electrical system – you’ll be glad you did when the lights go out!”
FAQs
What is a Generac transfer switch?
A Generac transfer switch is an electrical switch that transfers power between the utility power and a backup generator during an outage.
How does a Generac transfer switch work?
The Generac transfer switch monitors the utility power and when it senses an outage, it disconnects the utility power and connects the backup generator power to the home’s electrical system.
Do I need a professional to install a Generac transfer switch?
Yes, it is recommended to have a licensed electrician install a Generac transfer switch to ensure proper installation and safety.
Can I install a Generac transfer switch myself?
Unless you are a licensed electrician, it is not recommended to install a Generac transfer switch yourself as improper installation can lead to electrical hazards and damage to your home.